Running a MeArm on a Raspberry Pi is initially very simple. We hope to make it simpler still with some good example code. Right now it's very easy to get up and running with just a few jumper cables and an external power supply (like our 6V 2A power supply).

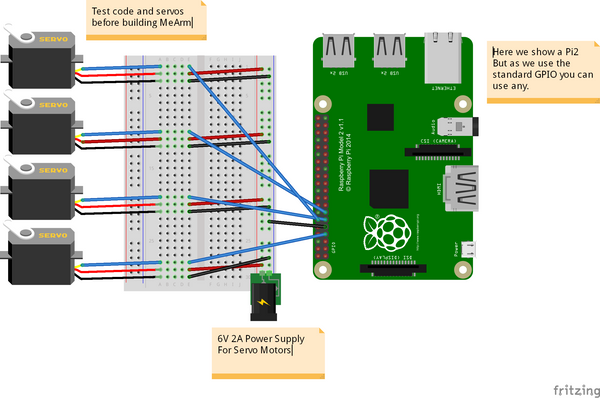
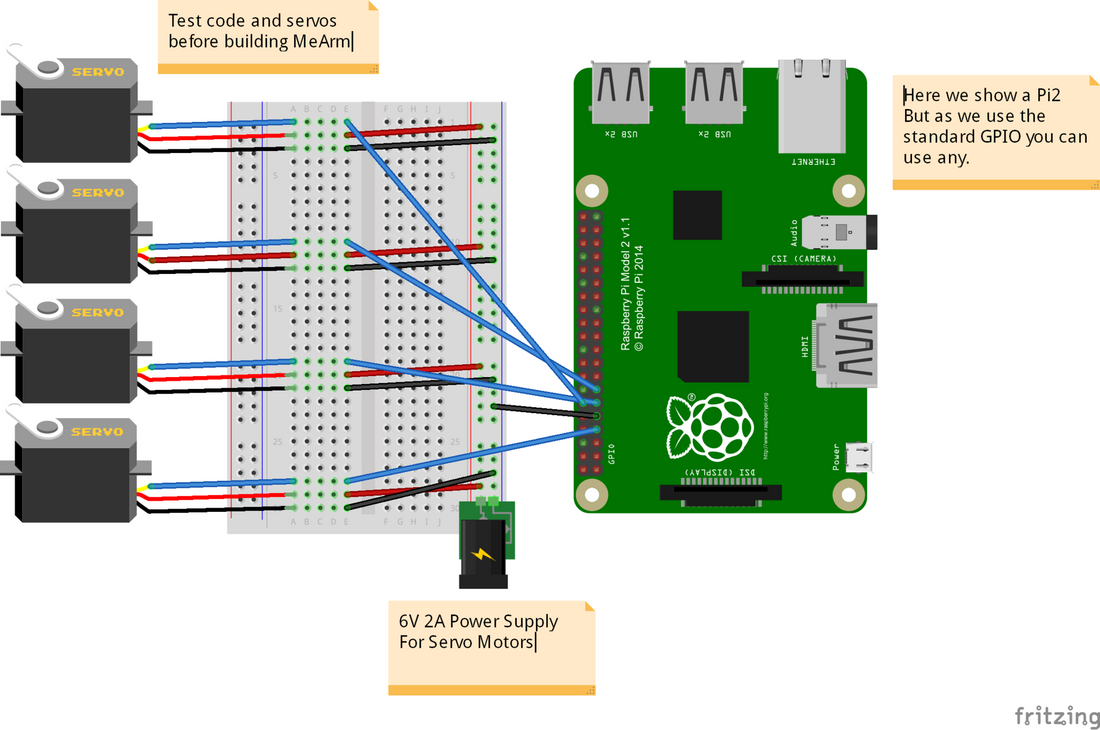
We're assuming you have a Raspberry Pi up and running and all of the goodies that you need to achieve that. With that running you're going to want to attach the Pi to the servos as shown below. We're using GPIOs 4, 17, 18 and 27. These will become servos 0,1,2 and 3 respectively. We recommend you do this whole process before building your MeArm to save you time in calibration and also to save you burning out your servos by sending them somewhere they can't go! (file available here)

The breadboard used in the image is just to make things look tidy. In reality you can just attach all the grounds and all the power lines and wire them directly to the power, then bring the PWM lines (the servo control wires that come from the GPIO) directly into the servos. Don't connect the 6V power to the GPIO (other than connecting the ground wire). Also it's not advised to draw the power for the servos through the GPIO, they can draw up to an amp each and the Pi isn't set up for that. Better safe than have to buy a new Pi!
Now we'll need to get to the command line on your Pi. Either boot to it or use a terminal in your GUI. We used a fresh install of Raspian.
|
pi@raspberry ~ $ git clone git://github.com/richardghirst/PiBits.git pi@raspberry ~ $ cd PiBits/ServoBlaster/user pi@raspberry ~/PiBits/ServoBlaster/user $ sudo ./servod --idle-timeout=2000 Board revision: 2 Using P1 pins: 7,11,12,13,15,16,18,22 Servo mapping: |
Now if everything is working ok, you'll be able to send the command
| pi@raspberry ~/PiBits/ServoBlaster/user $ echo 0=50% > /dev/servoblaster |
This will send servo 0 (the one attached to GPIO 4) to 50% of its range. Changing to echo 1=20% > /dev/servoblaster will send servo 1 to 20% of its 0 -->180 degree range.
Next up we use Python and something called TKinter (which should be installed on your Pi already). Create a new file using your favourite file editor (it should be GVIM - it will make you more popular, stronger and better looking). I called it MeArm.py. Add the following code to it and save.
| #!/usr/bin/env python from Tkinter import * #allows us to make a GUI with TKinter import os root = Tk() # First Set Up the Servos # Going to use lists for this SNums = [0,1,2,3] #Numbers of the Servos we'll be using in ServoBlaster SName = ["Waist","Left","Right","Claw"] #Names of Servos AInis = [90,152,90,60] #Initial angle for Servos 0-3 AMins = [0,60,40,60] #Minimum angles for Servos 0-3 AMaxs = [180,165,180,180] #Maximum angles for Servos 0-3 ACurs = AInis #Current angles being set as the intial angles Step = 5 for i in range(4): print(SNums[i],AInis[i],AMins[i],AMaxs[i],ACurs[i]) os.system('sudo /home/pi/PiBits/ServoBlaster/user/servod --idle-timeout=2000') #This line is sent to command line to start the servo controller #inc listens for all key presses. On certain presses in the if statements below it either calls a process to add or subtract from the current servo angle. def inc(event): print "pressed", repr(event.char) if repr(event.char) == "'a'": AAdd(0) if repr(event.char) == "'d'": ASub(0) if repr(event.char) == "'w'": AAdd(1) if repr(event.char) == "'s'": ASub(1) if repr(event.char) == "'j'": AAdd(2) if repr(event.char) == "'l'": ASub(2) if repr(event.char) == "'i'": AAdd(3) if repr(event.char) == "'k'": ASub(3) def callback(event): frame.focus_set() def AAdd(Servo): if ACurs[Servo] < AMaxs[Servo]: ACurs[Servo] = ACurs[Servo]+Step # micro = (1000 + (ACurs[Servo] * 5.555)) micro = (1000 + (ACurs[Servo] * 8.3333)) print(ACurs[Servo],micro) os.system("echo %d=%dus > /dev/servoblaster" % (SNums[Servo],micro)) else: print "Max Angle Reached",SName[Servo],"Servo" def ASub(Servo): if ACurs[Servo] > AMins[Servo]: ACurs[Servo] = ACurs[Servo]-Step # micro = (1000 + (ACurs[Servo] * 5.555)) micro = (1000 + (ACurs[Servo] * 8.3333)) print(ACurs[Servo],micro) os.system("echo %d=%dus > /dev/servoblaster" % (SNums[Servo],micro)) else: print "Min Angle Reached",SName[Servo],"Servo" frame = Frame(root, width=500, height=300) boxtext = Label(root, text="Click this box for keyboard command of the MeArm. Use the a d s w j l i and k keys for control.") boxtext.pack() frame.bind("<Key>",inc) frame.bind("<Button-1>", callback) frame.pack() root.mainloop() |
Using a terminal or the command line type
| pi@raspberry ~ $ python MeArm.py |
All being well you should now have a pop up box that tells you to click inside it to control your MeArm!
Here's a rough and ready video of the results!
This tutorial is thanks to Carl Monk, who did this nearly a year ago and has gone further than I have here. His excellent work can be found here.
We both rely on the ServoBlaster software by Richard Hirst and this great post by Cihat Keser on getting it running quickly.


6 comments
I got to issuing the command “echo 0=50% > /dev/servoblast” and did not see the servo movement. I double-checked the connections of power (5V DC power supply), GND and orange to GPIO4. I also have verified with an oscilloscope to see the pulses from GPIO4 and power/ground to servo connector. Tests each of the 4 servos of the MeArm and they do not move. Any suggestion? Thanks.
Your website has clear instructions for building the mearm deluxe or with Arduino. I want to build it for use with RasberryPi and your instructions for that are vague!
The wires in your calibration picture are the wrong colours and don’t have suitable ends for a breadboard.
The code required is very unclear for a non-python expert. There seems to be a lot of non-code in amongst the code so it is unclear what I need to code in python to calibrate the servos.
Then unlike the other two build instructions – there is no instruction on actually building the robot! Although I guess I can look at one of the other two for that!
Help!
nick
Also, is the python TKinter file duplicated? It looks like it starts again half way down!
The git repository for PiBits has an incorrect URL on this page – it’s richardghirst, not richardghisrt
Tiny type on the repo name:
git://github.com/richardghisrt/PiBits.git
Should be:
git://github.com/richardghirst/PiBits.git
Many thanks, keen to try the Servo Blaster, I didn’t know that it would be able to control servos well enough.